Meeting - March 14, 2010
We met at Jack Gellerstedt's shop in Forest, VA.
More on Banjos
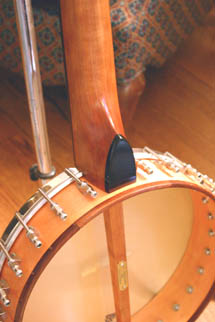
Jack Gellerstedt Jack explains more about banjo construction for those of us who would like to build one. We have abandoned the idea of a group banjo project in favor of individual builds for those who are interested. See the previous discussion from the meeting on November 14, 2009).
Options for the Rim
We discussed different options for the pot or rim. Some of these we talked about earlier.
- Buying one already made - easy but not very exciting.
- Buying a drum shell and cutting it to the proper depth - From a single drum shell, you can get a number of banjo rims.
- Steam bending one - A few meetings ago, Bob thought he might try this. No word on his progress.
- Building one up from veneers - This is the typical method. One potential downside is that there is a lot of glue surface which may adversly affect the tone.
- Building one up from circular arcs of wood - Jack used this method to add a decorative edge to a pre-made rim. Using this technique, the rim is built up from horizontal segments. A lot less glue surface area than the veneer method.
- Making one using staves - Barrels and some drums are made with staves although a banjo rim will not have the complex angles of a barrel. This technique makes the rim from vertical segments. A lot less glue surface area than the veneer method. We discussed two methods for staving:
- Angle cut staves -
- Bead and cove staves (are they still called staves?) -
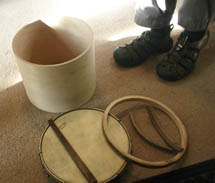
Larry and Woody decided to collaborate on building staved rims - Larry for a 6 string, nylon string banjo, and Woody for a bodhran (type of handheld drum).
Chet's walnut back and side sets
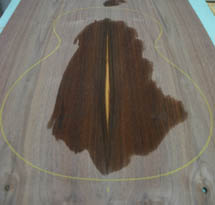
Chet brought some walnut back and side sets that he recently resawed.
Larry bought one set to use for a parlor guitar he's building for a friend. There was some nice sapwood that he wasn't sure would survive the jointing process for the bookmatched back seam. After taking it home, jointing the back seam, getting it to the proper thickness on the drum sander, and gluing it up, it looks really good. Here's a photo (with a little naptha to highlight the finished color) of the back glued up - luckily, there was enough sapwood still visible after jointing.
Howard's guitars in progress
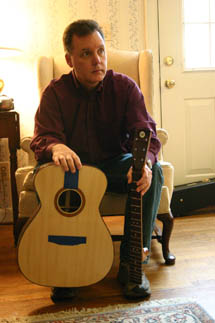
Here's Howard holding one of his OMs in progress and another in the final stages of applying finish.
Howard, on his projects:
Working on three guitars at the moment. One is an East Indian Rosewood with a Red spruce top that's going to my daughter. It's in an OM style which should fit her well. The other two are also OM's. The lighter colored body is Monkeypod coupled with a Sitka spruce top and the wild figured body is Amazon rosewood with a Red spruce top. The EIR guitar was buffed out and nearing set-up soon.
Woody's Alien
One of Woody's latest creations - an Alien head dulcimer. It's big, it's loud, and the alien's eys light up when it's played. BRL member Ted Sinoski designed the circuitry for the light show. As you can tell, Woody's not one to bow to tradition.
You can see the Alien's electronics on Woody's page.
His Alien is getting famous. It can also be seen here: http://www.siegelproductions.ca/fiddlefarmers/unusualinstruments.html
Larry's Dreadnought
Here's a picture of Chet checking out Larry's dreadnought in progress.
It's built following the Martin D-28 body shape. It was built from wood collected from various sources.
It's got a redwood top (wood from Woody - what else would you expect to get from Woody?). The top is made from 3 pieces glued in parallel.
The back, sides, and fretboard are cherry (from woodworking friend, Ed Wennerstrom). The back is 3 pieces of cherry with rosewood strips between, done in the Martin D-35 wedge mode.
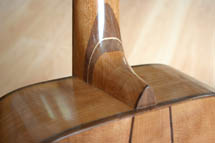
The neck is mahogany (from friend, neighbor, and woodworker, John Reith) with a walnut/maple/walnut feature stacked in the heel. The neck joint is a mortise and tenon bolt-on using "barrel" nuts and bolts from Lowes. (What, you didn't know they had a luthier section?)
The rosette came from a piece of maple Larry got from BRL member, Dennis McKim.
A little more finish work and this guitar will be ready for attaching the bridge and final set-up.
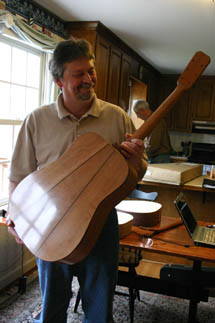
Woody's Redwood Top Guitar
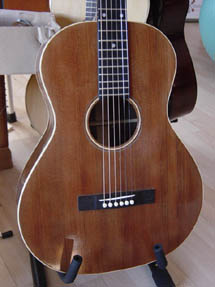
This guitar is based on a Gibson L-00 body style and has X-bracing in the top and back. It has a three-piece redwood top that came from excess wood cut from boards used in hot tub construction. The walnut back, neck and sides are from Virginia trees as is the white holly binding and faceplate on the headstock. The logo is inlaid cello binding.
The entire instrument is glued together using fish glue.
A high quality double action truss rod is installed in the neck and the neck is bolted (not glued) on using bolts and barrel nuts that are commonly used in furniture manufacture. This feature is especially useful should there ever be a need to reset the neck, because the only glue joint needing to be loosened is the fingerboard on the soundboard. Because fish glue is used, this is very easy to do, since fish glue is completely reversible with water.
Woody's Violin
Woody working on a violin, actually 3 violins. He's never made one before.
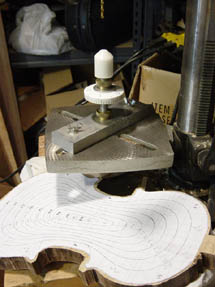
Woody says: Here is a sequence of photos that shows how I do the arching on violin plates.
Essentially, I copied contour lines from a drawing by Simone Sacconi from his book Secrets of Stradivari and then glued them to the piece of wood.
Next, I used my "caliper drill" that Ted Sinoski made for me which is very accurate is setting the depth for each contour interval and I drill the contours.
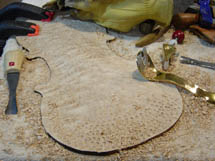
Next, the wood above the arching is removed first with gouges, then with finger planes and scrapers until it all the holes are are removed.
Now the plates are ready to be purfled. After they are purfled, the same process is used to hollow them out.
Two Jigs
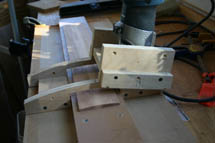
On the left is Larry's fretboard radiusing jig. It consists of a sled base, a sled that rides on the base, and a router carrier that rides on the sled. This sled is set for a 16" radius.
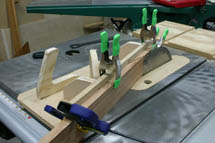
On the right is a scarf cut jig for the table saw to cut the scarf joint for a neck. This method builds the neck, from multiple pieces rather than using a single piece. The headstock is cut from a (roughly) 3/4" x 3" board at a 15 degree angle, reversed, and glued back on. Larry: With a good blade, this makes a cut that requires very little additional work. My first two scarf joints were cut by hand and required a lot of work. The next one I did was cut on a bandsaw and required a fair amount of clean up. Using this jig, the cut was so good it probably would have been OK without any clean up.